In this tutorial, we will -
- Create a Spring Boot Web Application.
- Create image for starting this application.
- Then we will run the above image as container to start the jar.
First create a Spring Boot project student-producer. Now create a student model like this:
package com.stackdev.model;

public class Student {
    private String sId;
    private String name;
    private Integer className;

    public Student() {
    }

    public String getName() {
        return name;
    }

    public void setName(String name) {
        this.name = name;
    }

    public Integer getClassName() {
        return className;
    }

    public void setClass(Integer className) {
        this.className = className;
    }


    public String getsId() {
        return sId;
    }

    public void setsId(String sId) {
        this.sId = sId;
    }

}
Next we will create a controller and create an instance of Student class like this:
package com.stackdev.controllers;

import org.springframework.web.bind.annotation.RequestMapping;
import org.springframework.web.bind.annotation.RequestMethod;
import org.springframework.web.bind.annotation.RestController;

import com.stackdev.model.Student;

@RestController
public class TestController {

    @RequestMapping(value = "/student", method = RequestMethod.GET)
    public Student firstPage() {

        Student s = new Student();
        s.setName("Anshu");
        s.setClass(12);
        s.setsId("1");

        return s;
    }

}
Now we will create the application file like this:
package com.stackdev;

import org.springframework.boot.SpringApplication;
import org.springframework.boot.autoconfigure.SpringBootApplication;
import org.springframework.cloud.client.discovery.EnableDiscoveryClient;

@SpringBootApplication
@EnableDiscoveryClient
public class SpringBootHelloWorldApplication {

    public static void main(String[] args) {
        SpringApplication.run(SpringBootHelloWorldApplication.class, args);
    }
}
In the application.properties we will assign the port as server.port=8080.
Our spring boot project is ready. We can retrieve student information in JSON format using this REST service. This project is developed to be deployed using JAR packaging.
Run maven command - clean install, and a jar file gets created in the target folder. Next we will start docker and deploy this jar using docker.
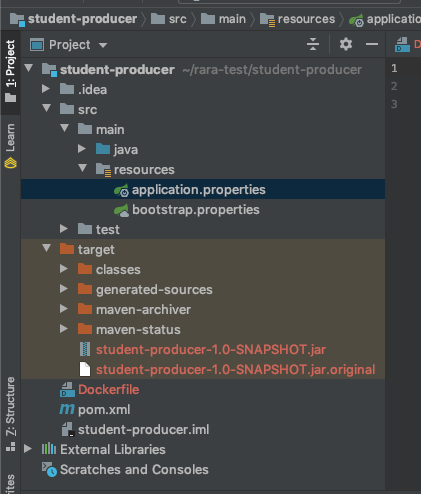
This is how the project structure will look :
We have created a Dockerfile. Docker file is a list of commands that we want the docker engine to execute. Go to the spring boot project folder and create a docker file as follows-
FROM openjdk:8
copy ./target/student-producer-1.0-SNAPSHOT.jar student-producer-1.0-SNAPSHOT.jar
CMD ["java","-jar","student-producer-1.0-SNAPSHOT.jar"]
Open the terminal and start the docker
systemctl start docker
Now open the terminal and go to the Spring Boot project folder. Next we will build an image with the name producer.
docker image build -t student-producer .
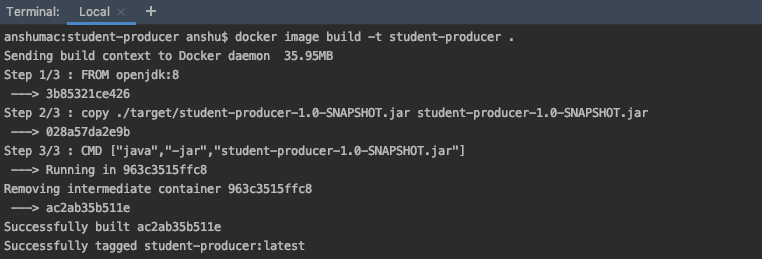
We can see that the image has been created.
Next we will run the above image as a container. Also we will be publishing the docker port 8080 to centos port 8080.
Usually we make use of the unique container id when we create a new container, but here we will give a name to the container and use it for referring the container.
docker container run --name producer -p 8080:8080 -d student-producer
Now, we have started the container with name as producer. Using the following command check the logs:
docker container logs producer
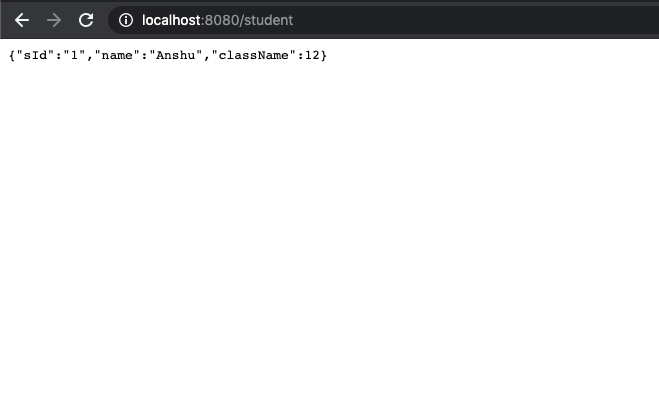
The application has started successfully. Go to http://localhost:8080/student, we will see that our application is deployed successfully.